Thursday, 26 March 2015

10 Minute Easy Easter Crafting : Make Bartholomew Bunny & Cheryl Chickadee!


Spend just 10 minutes each making this cute Easter Bunny and Chick! They really are EASY PEASY to make and the all the family can get involved in a spot of quick and fun Easter crafting!

What do you need?
http://www.gilliangladrag.co.uk/c/7629/Felt-Bundles
http://www.gilliangladrag.co.uk/p/6005/Gem-Tac-Glue
 http://www.gilliangladrag.co.uk/c/670/Felting-Wool-Tops-and-Fibres 
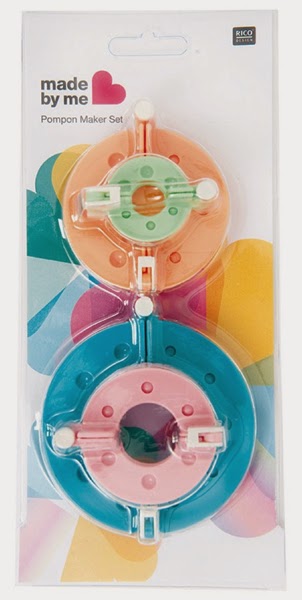
http://www.gilliangladrag.co.uk/p/7945/Pompom-Maker-Set-x-4-sizes
Well basically just some felt (like our mini felt bundle here) and some really good glue (like our Gem-Tac glue here) and some wool tops (here's our selection of wool tops packs!) and a Pompom maker like this. Then some scissors, some googley eyes (here's a link to the googley eyes we sell) and maybe a few offcuts of fabric for the bunny's bandana! :-)


First make a medium size and small size white wooltops pompom. If you don't know how to make a wooltops pompom, check out my blog tutorial on how to do that here first! It's fast and easy. Stick the small pompom on top of the large on using the glue. Leave to dry for a few mins....


Next cut a pink heart / feet from some pink felt and glue in place...


Then cut two ears from pink felt. Cover the ends in glue and pinch together. Leave to dry.


I used a bull dog clip to hold them whilst they dried a bit!


Stick the ears in place using more glue. A couple of pins are useful to stop them from falling off before they've dried!


Now stick two "googley eyes" in place and cut and stick a little pink nose. Oh SO CUTE now he's got a face!! :-)


To make Cheryl Chickadee just make one small yellow wool tops pompom. Cut 2 orange feet (3 toes on each please ;-) and a diamond shape folded in half to make the beak. Glue all in place et voila!

That's all there is to it folks :-)


Oh - and before I get asked, - Cheryl Chickadee is wearing a handmade felt 'Cherry Blossom Fascinator' - which is one of the many felt flower projects in my book "Felting Fabulous Flowers" and Bartholomew Bunny has a small bandana made from a scrap of fabric and pinned (or glued) at the back. You've got to ACCESSORISE! ;-)


Happy Easter Crafting!  xxx

Thursday, 26 February 2015

A Spring Wreath for Mother's Day or Easter


So  I thought I'd show you all how I made this simple Spring wreath - it might look complicated - but it's really easy once you know how! :-)
First of all - get hold of some sort of wreath - I bought this one for £6 at the local florists, but you could bend an old wire coat hanger, or use anything suitable that you can get hold of. It could be heart shaped like mine, or round - doesn't matter.


Next you're going to need about 1 metre of giant yellow pompom trim

and some other different ribbons and trimmings. Let me emphasize that you can use ANYTHING you have laying around! But... I used a metre each of: giant pink ric rac, yellow and orange flower jacquard ribbon, mint green mini pompom trim, pink & red vintage polka dot ribbon...


and a metre each of the lime and baby blue gathered elastic frilly trim above, (which I ADORE! :-) and some of our new super gorgeous braid trimming in lilac and orange too. 


I also added in some of the new Sajou Rochefort craft thread in yellow and black too. (LOVE this stuff!)

First things first...


start by wrapping the giant yellow pompom trim around the wreath base. If necessary - secure with some thread.


Next start adding some of the ribbons. I won't go into too much detail - you can be random! (But the frilly elasticated stuff looks good wrapped around and around as above - like a ra-ra skirt!!


Keep adding and wrapping ribbon here and there until the wreath starts to get quite covered up. Each time you add a piece, secure at the back with a knot.


I added in some hand spun wool yarns too, wrapping them round and round the wreath. If you don't have any, you could just use tightly wound wool tops. Or any yarn would do, - something like Noro, or a variegated yarn would work well here!


Now your wreath should really be starting to take shape - with most of the wreath covered. Add a few ribbon bows too.


And lastly make some little felt flowers to adorn the wreath. These can easily be made from ready made felt, or handmade felt if you know how!(See my book : Felting Fabulous Flowers)


Make a few simple spring-like daisies, by cutting a circle from some felt, cutting 8 evenly spaced slits around it with some small sharp scissors, and 'rounding' each off into a petal. Add flower centres using a felting needle and some yellow wooltops, or use some small buttons. Attach using our great glue called Gem-Tac - or a needle and thread.


If you're feeling adventurous, why not add a felt rose to your wreath too? You can make a Gilliangladrag Felt Rose Corsage Kit, or the process is outlined in my book if you want to use your own colours.


Finally,  add a suitable hanger and you're done! I even added a turquoise glitter ribbon bow on the hanging rope too. xxxx


Happy Mothers Day and Happy Easter, and most importantly (as it's my favourite time of year) Happy Spring! :-)

Wednesday, 28 January 2015

Heart Shaped Pompom tutorial - for Valentines Day, with LOVE!

Say it with a pompom this Valentines Day - easy and quick to make, a heart shaped pompom lasts longer than a card, and is more slimming than chocolate :-)
What will you need?

http://www.gilliangladrag.co.uk/p/9417/Heart-Shaped-Pompom-maker

Well you will undoubtedly need a heart shaped pompom maker, available from our Gilliangladrag website here...


http://www.gilliangladrag.co.uk/p/9417/Heart-Shaped-Pompom-maker

... and some sharp scissors and some yarn - any yarn will do really. But a cheap acrylic yarn in a bright red or pink is ideal. I used Stylecraft Special DK here Matador, Fiesta and Claret. (Make sure it's quite strong and sturdy yarn, as you'll be tying it around the middle later!)

With the pompom maker assembled, open one arm and start to wind the wool tightly from the top to the bottom on the first side. Secure the end and cut.

Now do the same around the other side. Secure and cut. 


Cut a length of yarn and double wrap around the middle of the pompom maker, finishing at the top. Tie ONCE only, as you'll come back to this later so don't make a knot!!!

http://www.gilliangladrag.co.uk/p/9417/Heart-Shaped-Pompom-maker

Tie the loose end each side around the little hooks to hold it in place temporarily. Like I said - you'll come back to this!

Now for the fun bit!

http://www.gilliangladrag.co.uk/p/9417/Heart-Shaped-Pompom-maker

snip away in the hollows on BOTH sides!

http://www.gilliangladrag.co.uk/p/9417/Heart-Shaped-Pompom-maker

snip snip snip...

http://www.gilliangladrag.co.uk/p/9417/Heart-Shaped-Pompom-maker

http://www.gilliangladrag.co.uk/p/9417/Heart-Shaped-Pompom-maker

what a lovely sight! :-)


Now trim the inner circle closer on both sides.

http://www.gilliangladrag.co.uk/p/9417/Heart-Shaped-Pompom-maker

And finally unhook your ends from earlier...

http://www.gilliangladrag.co.uk/p/9417/Heart-Shaped-Pompom-maker

... and start to pull REALLY REALLY TIGHTLY!...

http://www.gilliangladrag.co.uk/p/9417/Heart-Shaped-Pompom-maker

... until the little pompom heart starts coming together, and the pompom maker loosens a bit...

http://www.gilliangladrag.co.uk/p/9417/Heart-Shaped-Pompom-maker

 ...keep pulling and tightening, (as this bits really important!) Tie the top again, so you have a secure knot!

http://www.gilliangladrag.co.uk/p/9417/Heart-Shaped-Pompom-maker

Pull the pompom maker away, and your heart shaped pompom is BORN!

And then the best bit of all (in my opinion):

http://www.gilliangladrag.co.uk/p/9417/Heart-Shaped-Pompom-maker

Trim away with some very sharp scissors, making your pompom a perfect heart shape.

http://www.gilliangladrag.co.uk/p/9417/Heart-Shaped-Pompom-maker

And that's all there is to it! With LOVE on Valentines Day everyone :-) xxxx